Making sauerkraut at home is something I’ve been doing for two years now. It’s a perfect way to preserve your garden’s cabbage while creating gut healthy, delicious fermented food. Sauerkraut is packed with beneficial bacteria, vitamins, and a tangy flavor that enhances many dishes or is great as a side. Let’s dive into the process of turning fresh garden cabbage into homemade sauerkraut.
There are several compelling reasons to make your own sauerkraut:
Health Benefits: Homemade sauerkraut is rich in lactic acid bacteria, which promote gut health and boost your immune system. It’s also high in vitamins C and K, essential for your daily values.
Cost-Effective: Making sauerkraut at home is much cheaper than buying pre-made versions from the grocery store.
Flavor and Freshness: Freshly made sauerkraut has a superior taste compared to store-bought options, and you can customize it to your liking.
Control Over Ingredients: When you make your own, you can ensure there are no unwanted additives or preservatives, using simple ingredients like organic cabbage and salt.
For the best sauerkraut, start with the right type of cabbage:
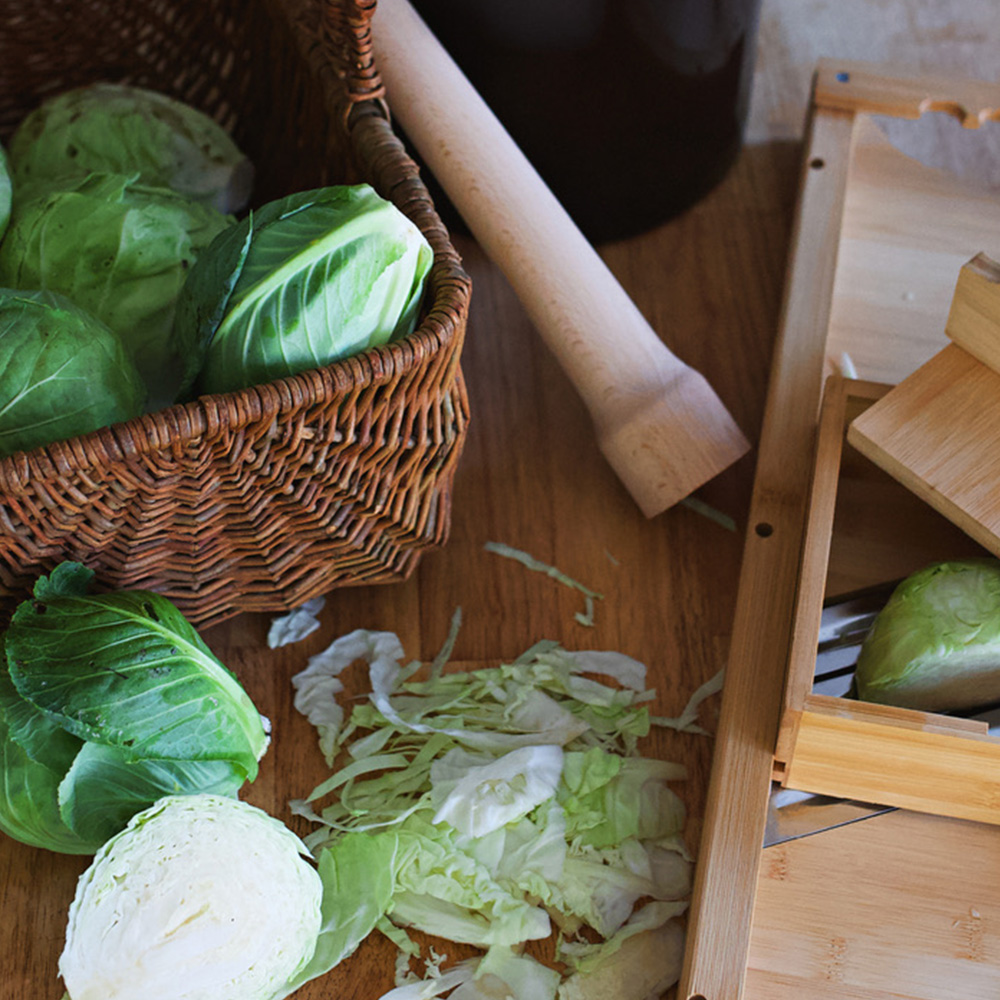
Types of Cabbage: Green cabbage, also known as white cabbage, is the most common choice, but you can also use red cabbage for a colorful twist.
Selecting the Best Cabbage: Choose firm, heavy heads of cabbage with tight leaves. Avoid cabbages with blemishes or cracks. (If they have small issues, use a knife to cut it away before slicing. It’s hard to get an organic, perfect cabbage from your garden.)
When to Harvest: Harvest cabbage when it’s mature and has a deep, vibrant color. This ensures the best flavor and texture. Most often this is done at the beginning of summer or late spring.
Use Right Away: Once your cabbage is harvested, try to use it same day for best results and flavor.
I used this whole set up from Roots and Harvest, who makes high quality homesteaders supply. However, it can also be made in a half or full gallon glass jar with a rock as a weight covered in a bag. Don’t let not having certain items hold you back from homesteading. It’s a process where you do what you can with what you have in the moment. Homesteading is a marathon, not a sprint!
That being said, last year I did it in a glass jar with a rock, but this year, I was able to have the proper tools which made an overall easy process even easier!
Gather the following ingredients and equipment before you start:
Ingredients:
Fresh cabbage (about 5 pounds or 2 heads of cabbage)
Salt (3 tablespoons; sea salt or kosher salt preferred. I recommend Redmond Real Salt, use code Eryn_Whalen for 15% off your order + free shipping. Do not use iodized table salt)
Optional spices (caraway seeds, pepper flakes, etc.)
Equipment:
Fermentation vessel (large mason jar or fermentation crock) I do not recommend using plastic with anything fermented.
Sharp knife and cutting board or cabbage slicer
Large mixing bowl
Clean cloth or fermentation lid
Weights (fermentation weight, ziplock bag filled with water, or fermentation kit)
Clean jar
Preparation Steps:
Wash and Remove Outer Leaves: Rinse the cabbage thoroughly and remove the outer leaves of the cabbage.
Quarter and Core the Cabbage: Cut the cabbage into quarters and remove the core.
Slice the Cabbage: Thinly slice the cabbage into fine shreds using a sharp knife, cabbage slicer, or food processor.
Salting the Cabbage: Place the sliced cabbage in a large mixing bowl and sprinkle with salt. The ratio is about 1 tablespoon of salt per pound of cabbage.
Massage the Cabbage: Use your clean hands to massage the cabbage for about 5-10 minutes until it starts to release its juices, creating its own brine.
Packing the Cabbage: Transfer the cabbage and its juices into the fermentation vessel. Press down firmly to eliminate air pockets and ensure the cabbage is submerged in enough liquid.
Adding Weights: Place a weight (a clean rock, a smaller jar filled with water, or fermentation weights) on top of the cabbage to keep it submerged.
Covering the Vessel: Cover the vessel with a clean cloth secured with a rubber band or use an airlock lid to create an anaerobic environment.
Optimal Conditions: Ferment the sauerkraut at a cool room temperature (65-75°F) away from direct sunlight. A dark place is ideal.
Timeframe: The fermentation process can take anywhere from 1 to 4 weeks depending on the temperature and your taste preference.
Signs of Success: Bubbles, a tangy aroma, and a slight sour taste indicate successful fermentation.
Troubleshooting: If mold growth occurs, scrape it off immediately. Off smells or a mushy texture may indicate spoilage. Good news is, this is rare when following proper steps.
When It’s Ready: Taste the sauerkraut after one week. Once it reaches your desired tanginess, it’s ready to eat.
Storage: Transfer the sauerkraut to smaller jars, seal them, and store in the refrigerator. Properly stored sauerkraut can last several months.
Serving Suggestions: Use sauerkraut as a side dish, on hot dogs, in salads, or as a topping for sausages and meats.
Can I Add Other Vegetables?: Yes! You can add carrots, garlic, or ginger to your sauerkraut for additional flavors.
How Long Does Homemade Sauerkraut Last?: In the refrigerator, it can last up to 6 months. The flavor continues to develop over time.
What If My Sauerkraut Is Too Salty?: Rinse it before serving to reduce the saltiness.
Why Is There Not Enough Brine?: If you don’t have enough brine after massaging the cabbage, you can add salt water (1 teaspoon of salt dissolved in 1 cup of water) to ensure the cabbage is submerged.
How Do I Prevent Mold Growth?: Ensure the cabbage is fully submerged and use a clean jar and utensils. An airlock lid can help create the right environment for lactobacillus bacteria to thrive.
Is Homemade Sauerkraut Good for Medically Restrictive Diets?: Sauerkraut is low in calories and rich in nutrients, but consult your doctor if you are on a medically restrictive diet.
Making sauerkraut at home is a rewarding and straightforward process that yields a delicious and nutritious food. Give it a try and enjoy the benefits of homemade fermented cabbage.
yield: GALLON
prep time: 20 MINUTES
additional time: 7 DAYS
total time: 7 DAYS 20 MINUTES
Learn the best way to make homemade sauerkraut from fresh garden cabbage! This step-by-step guide covers everything from selecting the right cabbage to the fermenting process, ensuring you get delicious, probiotic-rich sauerkraut every time. Perfect for beginners and seasoned fermenters alike.
2 heads of fresh cabbage (about 5 pounds)
3 tablespoons sea salt or kosher salt
Optional: caraway seeds, pepper flakes, or other spices
Prepare the Cabbage:
Remove the outer leaves of the cabbage. Rinse the heads of cabbage under cool water.
Quarter the cabbage and remove the core.
Slice the cabbage into thin shreds using a sharp knife or food processor.
Salting the Cabbage:
Place the sliced cabbage in a large mixing bowl.
Sprinkle the cabbage with 3 tablespoons of salt (approximately 1 tablespoon per pound of cabbage).
Massage the cabbage with your clean hands for 5-10 minutes until it starts to release its juices and creates its own brine.
Packing the Cabbage:
Transfer the cabbage and its juices into a large mason jar or fermentation crock.
Press the cabbage down firmly with a wooden spoon to eliminate air pockets and ensure it is submerged in its own liquid.
If there is not enough liquid, add salt water (1 teaspoon of salt dissolved in 1 cup of water) to cover the cabbage.
Adding Weights:
Place a fermentation weight or a ziplock bag filled with water on top of the cabbage to keep it submerged.
Cover the jar with a clean cloth secured with a rubber band or use an airlock lid to create an anaerobic environment.
Fermentation:
Place the jar in a cool, dark place (65-75°F) and let it ferment for 1 to 4 weeks.
Check the sauerkraut daily for the first week. If scum forms on the top, remove it.
Storing and Enjoying:
Taste the sauerkraut after 1 week. Once it reaches your desired tanginess, transfer it to smaller jars and store in the refrigerator.
Enjoy your homemade sauerkraut as a side dish, on hot dogs, or as a topping for sausages and meats.
For additional flavors, you can add carrots, garlic, or ginger to the cabbage.
Properly stored sauerkraut can last up to 6 months in the refrigerator.
Items needed:
Large mixing bowl
Sharp knife and cutting board
Large mason jar or fermentation crock
Fermentation weights or ziplock bag filled with water
Clean cloth or airlock lid
Wooden spoon
Nutrition Information:
YIELD: 75 SERVING SIZE: 1
Amount Per Serving: CALORIES: 8TOTAL FAT: 0gSATURATED FAT: 0gTRANS FAT: 0gUNSATURATED FAT: 0gCHOLESTEROL: 0mgSODIUM: 261mgCARBOHYDRATES: 2gFIBER: 1gSUGAR: 1gPROTEIN: 0g
Make sure to subscribe to Eryn Whalen's Blog for more homesteading and gardening tips.
And follow her on social media for updates and join the community discussions.